Wednesday 30 July 2014

Customize web page on Cisco router using TCL

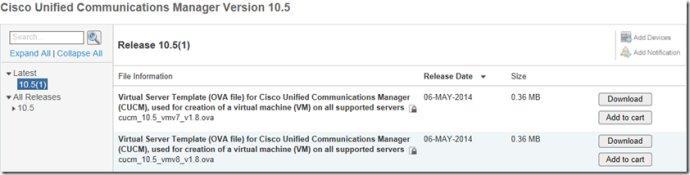
The aim of the article is to help you customize a web page that runs on Cisco router. Please download the package from this link. And upload each file onto flash disk of your router.
https://drive.google.com/file/d/0B5tzzJsbkWkIQ19SeG9vSExmT0U/edit?usp=sharing
We will use the basic template that downloaded from cisco beyond website. Also, with the help of EEM, setup and run the website coded by TCL.
Turn off http server functions first, and then set the configurations below:
Router#configure terminal
Enter configuration commands, one per line. End with CNTL/Z.
Router(config)#no ip http server
Router(config)#event manager directory user policy “flash:/”
Router(config)#event manager policy http_server.tcl
Router(config)#end
Router#event manager run http_server.tcl
Open browser, type the ip address of the router:
It will trigger the “http_server.tcl” , let’t see that’s inside:
 if {$filename == ""} {set filename "index.html"}
if we didn’t specify path, it will redirect us to “index.html”, let’s have a look this file:
<script type="text/javascript">
document.location = "chap4e3.tcl";
</script>

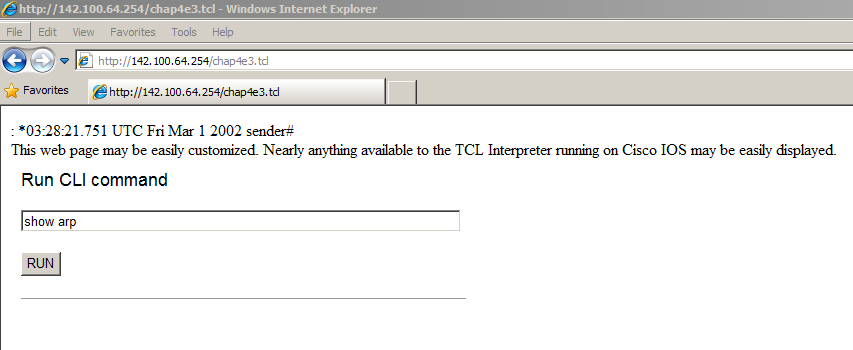
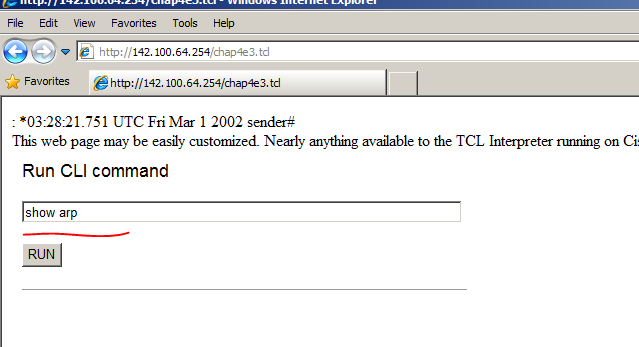
By using the script file : chap4e3.tcl, in this file we run ”show clock ” and have user input whatever cisco command they want in the form, and give the value to “runcli.tcl” file to display results:


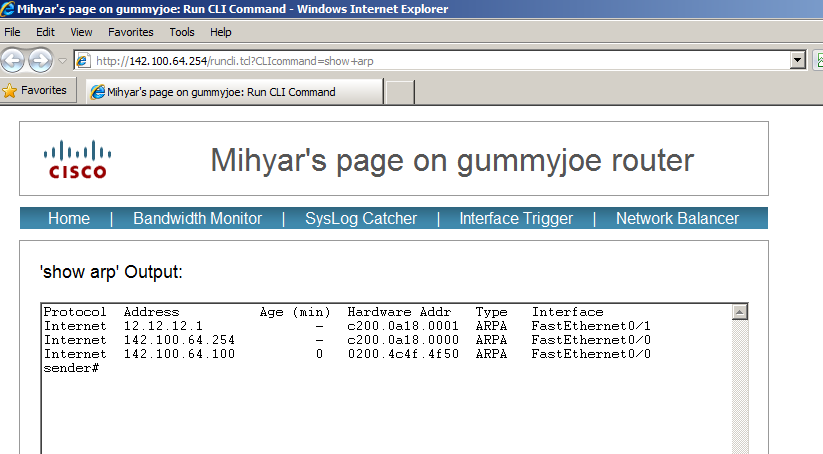
design a background script to display the results given by cli command:

ipsla.tcl:

set ipaddr [lindex $parmlist 1]
if {[catch {cli_open} output]} {
    error $output $errorInfo
    } else {
            array set cli_fd $output
    }
if {[catch {cli_exec $cli_fd(fd) "enable"} output]} {
    error $output $errorInfo
    }
if {[catch {cli_exec $cli_fd(fd) "show ip sla monitor statistics"} ipslashowcmd]} {
    error $ipslashowcmd $errorInfo
    }
if {[catch {cli_close $cli_fd(fd) $cli_fd(tty_id)} output]} {
    error $output $errorInfo
    }
   
set ipslaoutput [string map {"\r\n" "\n" "\"" "&#148;" "<" "&#060;" ">"
"&#062;" "'" "&#146;"} $ipslashowcmd]   
   
set header "<html>
<head>
<title>IP SLA Measurement Results Page</title>
<script>
function clear_field(field, value) {if(field.value == value) field.value = '';}
function init_field(field, value) {if(field.value == '') field.value = value;}
</script>
</head>
<body>
IP SLA Measurement Results Page<br><br>
We are monitoring : <br>
$ipaddr<br><br>
The Latest results:<br>
<textarea name='body' style='WIDTH: 710px; HEIGHT: 465px; color:#000000; font-
family: courier; font-size: 8pt'>$ipslaoutput</textarea>
</body>
</html>"

set middle ""
set footer ""
set httpheader "HTTP/1.1 200 OK

Content-Type: text/html; charset=UTF-8
Content-Transfer-Encoding: binary
"

puts $httpsock $httpheader$header$middle$footer


Sunday 27 July 2014

Embedded Menu Manager sample

EMM was introduced into Cisco IOS since 12.4(20)T and only applies to 2800/3800 or more platforms. It enables you to create a xml-based that provide a simple user interface.

Code:

 <Menu MenuName="My First Menu" schemaVersion="1.1">
<MenuTitle>
</MenuTitle>

<Item ContinuePrompt="true">
<ItemTitle>
<Constant String="This is the first item"/>
</ItemTitle>
<IOSExecCommand>"show clock"</IOSExecCommand>
</Item>

<Item ContinuePrompt="true">
<ItemTitle>
<Constant String="Count Hostname Length"/>
</ItemTitle>
<EmbeddedTCL>
<TCLCommand>return [string length [hostname]]</TCLCommand>
</EmbeddedTCL>
</Item>

<Item>
<ItemTitle>
<Constant String="Exit"/>
</ItemTitle>
</Item>

</Menu>


save the code as a file "my.mdf"

run the script using command:

emm mdf flash:my.mdf

1. This is the first item
2. Count Hostname Length
3. Exit


choose 1:

*11:43:06.924 CN Mon Jul 28 2014

Press any key to continue...


choose 2

7

Press any key to continue...


choose 3 to exit


Wednesday 23 July 2014

Make a router become a syslog server using tcl script

 Code:
global my_sock
global my_data

proc Listener {port action} {
global my_sock
if {$action == "START"} {
set my_sock [socket -server on_connect $port]
} else {
if {[info exists my_sock]} {
puts "Closing my socket"
close $my_sock
}
}
return $my_sock
}

proc on_connect {newsock clientAddress clientPort} {
puts "socket is connected now"
fconfigure $newsock -blocking 0
fileevent $newsock readable [list handleInput $newsock]
}

proc handleInput {f} {
global my_data
if {[eof $f]} {
fileevent $f readable {}
close $f
return
}
set my_data [read -nonewline $f]
regsub -all {<[0-9]+>[0-9]+: } $my_data " " output
if {[string length $output]} {
puts stdout "$output"
}
}

Listener 9500 START
vwait my_sock

save the file to the router that will run the script:

 TCLRouter#copy tftp: flash:
Address or name of remote host [142.100.64.100]?
Source filename [syslogd_book.tcl]?
Destination filename [syslogd_book.tcl]?
%Warning:There is a file already existing with this name
Do you want to over write? [confirm]
Accessing tftp://142.100.64.100/syslogd_book.tcl...
Erase flash: before copying? [confirm]

TCLRouter#dir         
Directory of flash:/

    1  -rw-         757                    <no date>  syslogd_book.tcl


run the script on the router:
 TCLRouter#tclsh flash:syslogd_book.tcl

On R2, type syslog command to save logs to the router that is running the script via tcp port 9500:
R2:  logging host 12.12.12.1 transport tcp port 9500

will see the router is recording logs from R2:

TCLRouter#tclsh flash:syslogd_book.tcl
socket is connected now
 *Mar  1 00:26:51.763: %LINK-5-CHANGED: Interface Loopback1, changed state to administratively down
 *Mar  1 00:26:53.939: %LINK-3-UPDOWN: Interface Loopback1, changed state to up *Mar  1 00:26:54.939: %LINEPROTO-5-UPDOWN: Line protocol on Interface Loopback1, changed state to up *Mar  1 00:26:57.851: %SYS-6-LOGGINGHOST_STARTSTOP: Logging to host 12.12.12.1 started - reconnection
 *Mar  1 00:26:57.867: %LINK-5-CHANGED: Interface Loopback1, changed state to administratively down
 *Mar  1 00:26:58.867: %LINEPROTO-5-UPDOWN: Line protocol on Interface Loopback1, changed state to down
 *Mar  1 00:34:26.835: %SYS-5-CONFIG_I: Configured from console by console 


Another example explains the question you may be wondering how to store sys logs received from R2 into a file.

code:

global my_sock
global my_data
global my_mode
global my_file

proc Listener {port action filename} {
global my_sock
global my_file
global my_mode
set my_mode 0

if {$action == "START"} {
    set my_sock [socket -server on_connect $port]
    set my_mode 1
} elseif {$action == "STARTWriting"} {
    set my_sock [socket -server on_connect $port]
    set my_file [open $filename WRONLY]
    set my_mode 2
} else {
if {[info exists my_sock]} {
    puts "Closing my socket"
    close $my_sock
}
}
    return $my_sock
}

if {[info exists my_file]} {
#if the socket is really there, close it
puts "Closing my file"
close $my_file
}

proc on_connect {newsock clientAddress clientPort} {
    puts "socket is connected now"
    fconfigure $newsock -blocking 0
    fileevent $newsock readable [list handleInput $newsock]
}

proc handleInput {f} {
global my_data
global my_file
global my_mode

if {[eof $f]} {
    fileevent $f readable {}
    close $f
    return
}

set my_data [read -nonewline $f]
regsub -all {<[0-9]+>[0-9]+: } $my_data " " output

if {[string length $output]} {
    puts stdout "$output"
    if {[expr ($my_mode == 2)]} {
    puts $my_file $output
}
}
}

###################################
#check if input any
if {$argc == 0} {
puts "Usage: syslogd port filename"
puts "port is the TCP port to listing for incoming connection"
puts "filename is optional parameter to use for writing the syslog data"
return
}
set port [lindex $argv 0]

#check if input a port number
if {[expr (1 != [string is digit $port])]} {
puts "must provide a numeric port number"
return
}

#verify port is in the valid range
if ([expr (1 != (0 < $port))]) {
puts "port number too low"
return
}

#verify port is in the valid range
if ([expr (1 != ($port < 65536))]) {
puts "port number too high"
return
}

if {$argc == 1} {

#only provide port
Listener $port START 0
} elseif {$argc == 2} {

#save filename
set my_filename [lindex $argv 1]

#varify inputs
Listener $port STARTWriting $my_filename
} else {
puts "Usage: syslogd port filename"
puts "port is the TCP port to listing for incoming connection"
puts "filename is optional parameter to use for writing the syslog data"
return
}

exec "term esc 27"
vwait my_sock


run the script on TCLrouter:

TCLRouter#tclsh flash:syslogd_book2.tcl 9500 flash:syslog.txt
socket is connected now
 *Mar  1 00:17:52.487: %LINK-3-UPDOWN: Interface Loopback0, changed state to up
 *Mar  1 00:17:55.239: %LINK-5-CHANGED: Interface Loopback0, changed state to a
ministratively down
 *Mar  1 00:18:03.739: %SYS-6-LOGGINGHOST_STARTSTOP: Logging to host 12.12.12.1
started - CLI initiated


on R2, cancel recording logs to TCLrouter

r2(config)#no logging host 12.12.12.1 transport tcp port 9500


simultaneously, script will stop.

TCLRouter#

Connection to host lost.


a file was generated by the script

TCLRouter(tcl)#dir
Directory of flash:/

    1  -rw-        2258                    <no date>  syslogd_book2.tcl
    2  -rw-         308                    <no date>  syslog.txt


 check the file with logs

TCLRouter(tcl)#more flash:syslog.txt
 *Mar  1 00:17:52.487: %LINK-3-UPDOWN: Interface Loopback0, changed state to up
 *Mar  1 00:17:55.239: %LINK-5-CHANGED: Interface Loopback0, changed state to administratively down
 *Mar  1 00:18:03.739: %SYS-6-LOGGINGHOST_STARTSTOP: Logging to host 12.12.12.1 started - CLI initiated


On sender router, you may want to filter some kinds of syslog by using this code:

if [string match "*by console" $::orig_msg] {
return ""
} else {
return $::orig_msg


this code is used for filtering the syslog generated after exiting configuration mode. 

logging console filtered 
logging filter flash:filter3.tcl   


 you may also want to customize syslog by using tcl script. here is the code:

 set text $::format_string
set listp 0

while {$listp < [llength $::msg_args]} {
set beg [string first %s $text]
set end $beg
incr end
set text [string replace $text $beg $end [lindex $msg_args $listp]]
incr listp
}

return "$buginfseq$timestamp: %$facility-$severity-$mnemonic: $text"


save it as filter7.tcl,  setup global configurations for  "timestamp" and "sequence number"
service timestamps log datetime
service sequence-numbers 

exit configuration mode. syslog is displayed as follows:

sender#000077: *Mar  1 03:02:26: SYS-5-CONFIG_I: Configured from console by console


Friday 18 July 2014

Install CUCM 10.0 and IMP

First, a little bit remind, in figures, this documents may contain some Chinese, but if you can find English version software, it does not matter.
Second, after EVC released UC8.0, Cisco recommended customer to use virtualized environment to develop UC projects. It’s worth speaking up, from 10.0, CUCM, as very core component of Cisco UC, no longer can be installed on MCS server. It needs VMWARE platform, so in this document, we use virtual machines based upon VSphere of VMWARE.
first step, we have to install a CUCM cluster.
There are three sites, two of which is branches, one headquarter. SB, SC for short name of branch 1 and 2.  
For installing HQ and CUCM cluster, CUCM cluster is able to consist of up to 20 hosts. Super cluster even doubles this number. In this document, cluster in HQ contains three hosts, one publisher, and two subscribers.
HQ-CUCM-PUB,HQ-CUCM-SUB1,HQ- CUCM-SUB2.
After installing, in CLB10.X folder of VCenter:
clip_image001
Let’s install first CUCM in a cluster, which is a publisher:

clip_image002
Download OVA template using partner CCO account. For this version is CUCM 10.5
clip_image003
clip_image004
clip_image005
OVA template is small only hundreds KB. Make it clear. This file is for resources allocation. If you clearly know how many amount of CPU, memories, disk place the virtual machine will use, you don’t have to download this file at all. However, Cisco uses this method to simplify the procedure of installation because it may cause many problems, like failed to install software, unstable of function and more if there are some unreasonable parameters configured.
clip_image006
Therefore, in this lab, to install all virtual machines, we downloaded OVA templates unless the resources that OVA requires are not able to be achieved by my vcenter, in this case I will change some manually
clip_image007
Import OVA template
clip_image008
From here, we can see some customized properties and information in OVA file
clip_image009
Configure name and path of list
clip_image010
clip_image011
Assign user nodes, this size is dependent on resources ( CPU, memories and disk space). In fact, in  the template Cisco provides, here is what we have to change. In this lab, we use smallest one.
clip_image012
Choose 1000 user nodes
clip_image013
Cluster 1
clip_image014

clip_image015
clip_image016
clip_image017
clip_image018
clip_image019
clip_image020
clip_image021
clip_image022
clip_image023
clip_image024
clip_image025
If you are using UCS, hardware checking will pass.
I can be sure you can pass this if you are using other brands
clip_image026
clip_image027
clip_image028
clip_image030
clip_image031
clip_image029
clip_image032
clip_image033
clip_image034
clip_image035
clip_image036
clip_image037
clip_image038
Fill in password for OS access
clip_image039
clip_image040
clip_image041
From 8.0, you cannot skip available NTP server
clip_image042
Password for accessing cluster, must be same within a cluster.
clip_image043
clip_image044
I don’t need TAC to help in future choose NO.
clip_image045
Password for GUI
clip_image046
clip_image047
clip_image048
clip_image049
至此,CUCM的PUB就安装完成了,在干净配置的前提下关机做好相应的虚拟机镜像。以便后期实验能通过快照回滚到干净的CUCM
clip_image050
clip_image051
clip_image052
clip_image053
clip_image054
clip_image055
Install IMP(CUPS)
clip_image056
clip_image057
clip_image058
clip_image059
clip_image060
clip_image061
clip_image062
clip_image063