Jabber Mobile and Remote Access (MRA) with Cisco Expressway featured with SSO
Prerequisite
This post will complete the configuring Expressway Core and Edge to provide MRA capability with SSO enabled. My test environment is under 11.5 and what else I have as following:
- Public domain name: voicelab.ca by Go Daddy
- Two public IPs assigned to Expressway E and IDP. You may have your own.
- Internal SRV record: _cisco-uds._tcp.MYDOMAIN.COM
- External SRV records: _collab-edge._tls.YOURDOMAIN.COM , _sips._tcp.MYDOMAIN.COM
- Assuming Jabber is working on promise with SSO
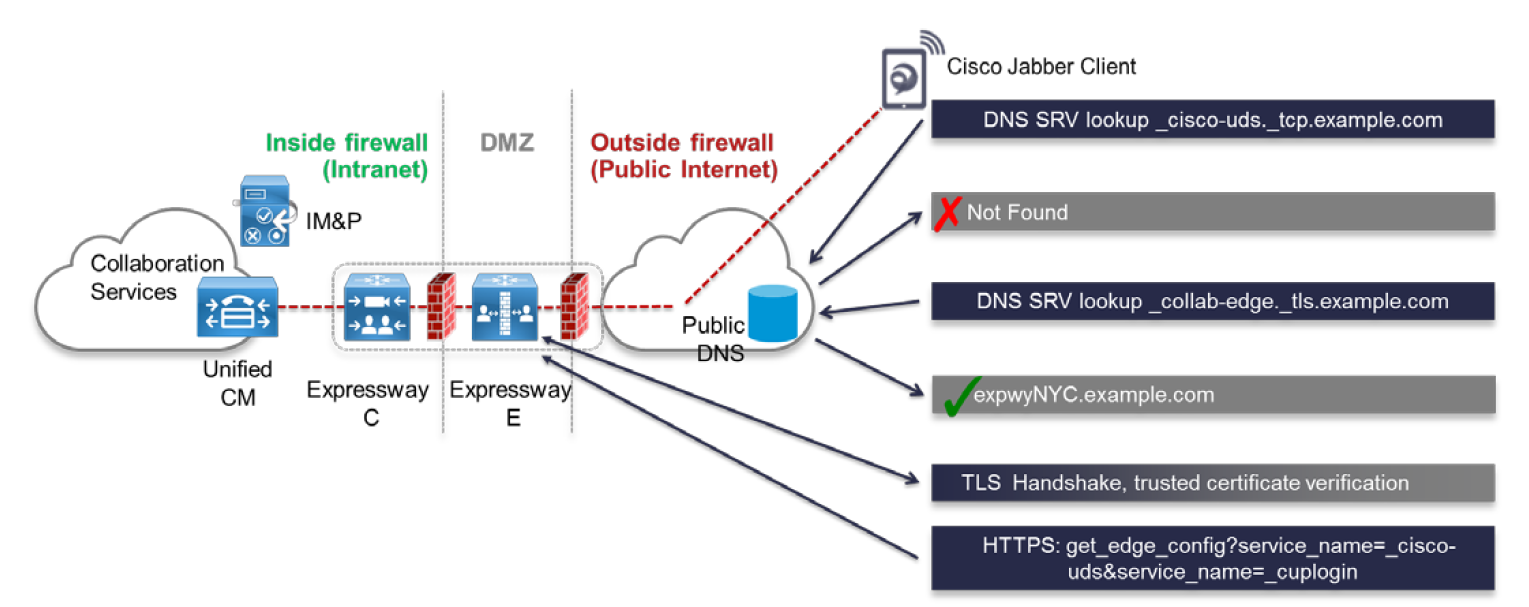
External SRV
_collab-edge._tls

IDP A record
Expressway-E A record
CA Root Certificate
Assuming you have basic configuration done on both Expressway C and E, the next is to upload CA Root certificate.


Client-Server CSR
On both C and E
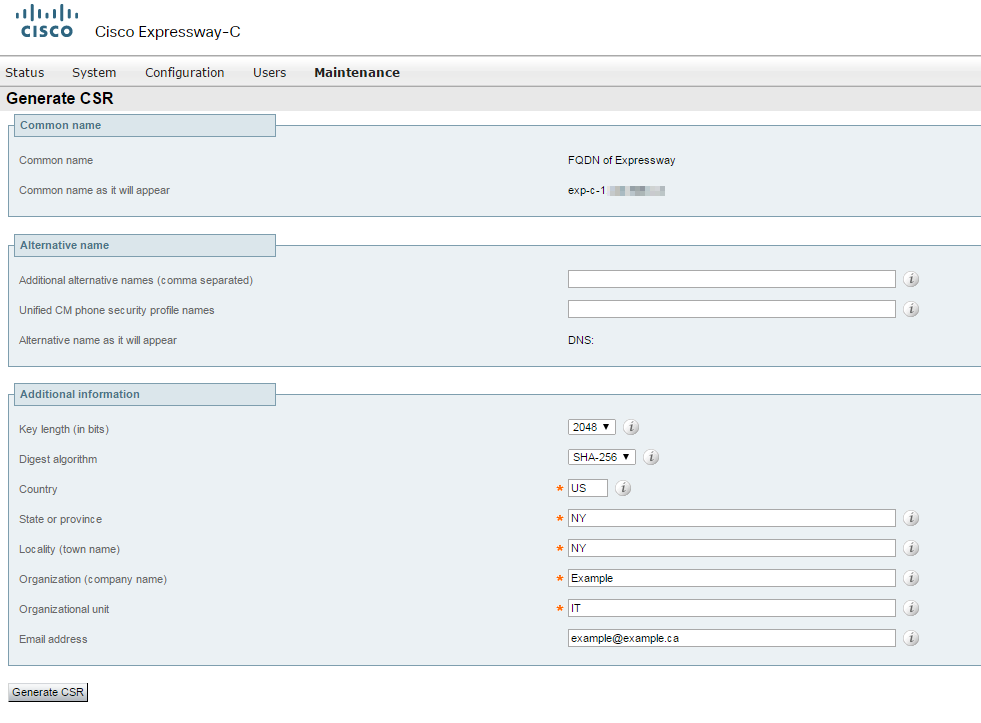
Download CSRs and save them
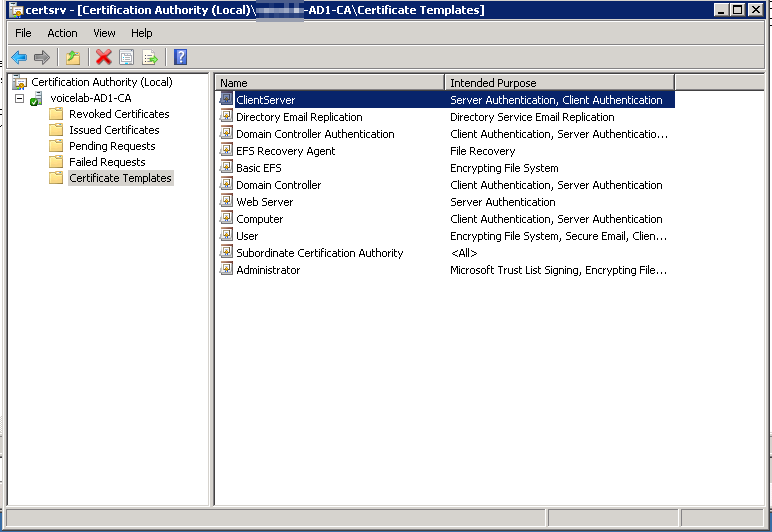
Client-Server Template
The CA component of Microsoft Active Directory Certificate Server (ADCS) must be able to issue a certificate that can be used for authentication of the Expressway as client or server
AD CS in Windows Sever 200 Standard R2 (and later) can issue these types of certificates, if you create a certificate template for them. The default "Web Server" certificate template in AD CS creates a certificate fro Server Authentication. The server certificate for the Expressway also needs Client Authentication if you want to configure a neighbor or traversal zone with mutual authentication( where TLS verify mode is enabled)
1. open the Certificate Authority application by going to Start > All Programs > Administrative Tools > Certification Authority.
2. Click the plus (+) sign next to dcloud-AD1-CA to expand it and click on Certificate Templates below.
3. Right click on Certificate Templates and choose Manage from the pop-up menu.
4. Right click on Web Server and choose Duplicate Template from the pop-up menu.
5. Verify Microsoft Server 2003 Enterprise is selected and then click OK.
6. Configure the following parameters for the New Template.
• Template display name: ClientServer
• Template name: ClientServer (pre-populated)
• Click the Request Handling tab and click the checkbox for Allow private key to be exported
• Click the Extensions tab
• Verify that Application Policies is selected and then click Edit
• Click Add
• Click to highlight Client Authentication from the list, click OK, and then click OK to confirm the addition
• Click OK one more time to save the new template
7. Close the Certificate Template Console by using the X in the top right corner of the window.
8. Right click on Certificate Templates and choose New > Certificate Template to Issue from the pop-up menu.
9. Click ClientServer from the list to highlight it and then click OK.
10. Close the Certificate Authority (certsrv) console.
Submit and Download a CA Signed Certificate
Do this on both E and C

Upload CA Signed Certificate
Do this on both E and C
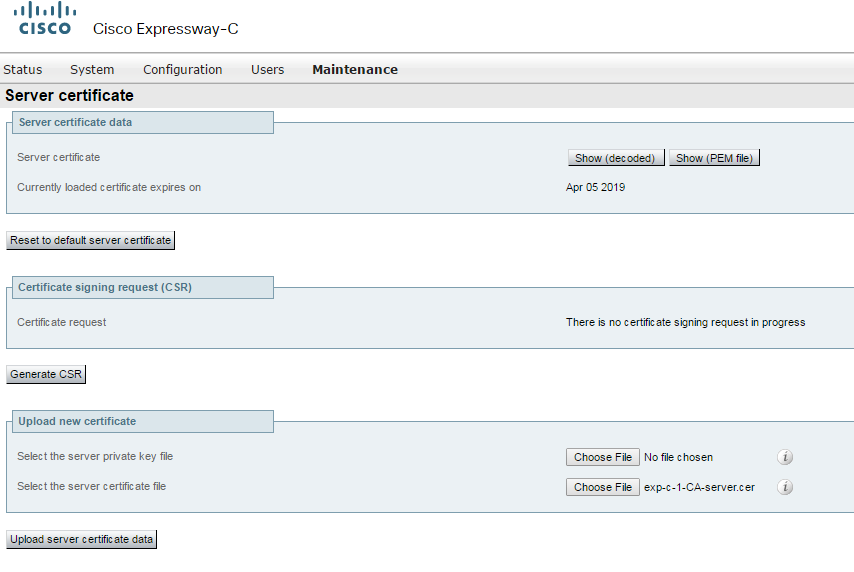
After this, restart both server.
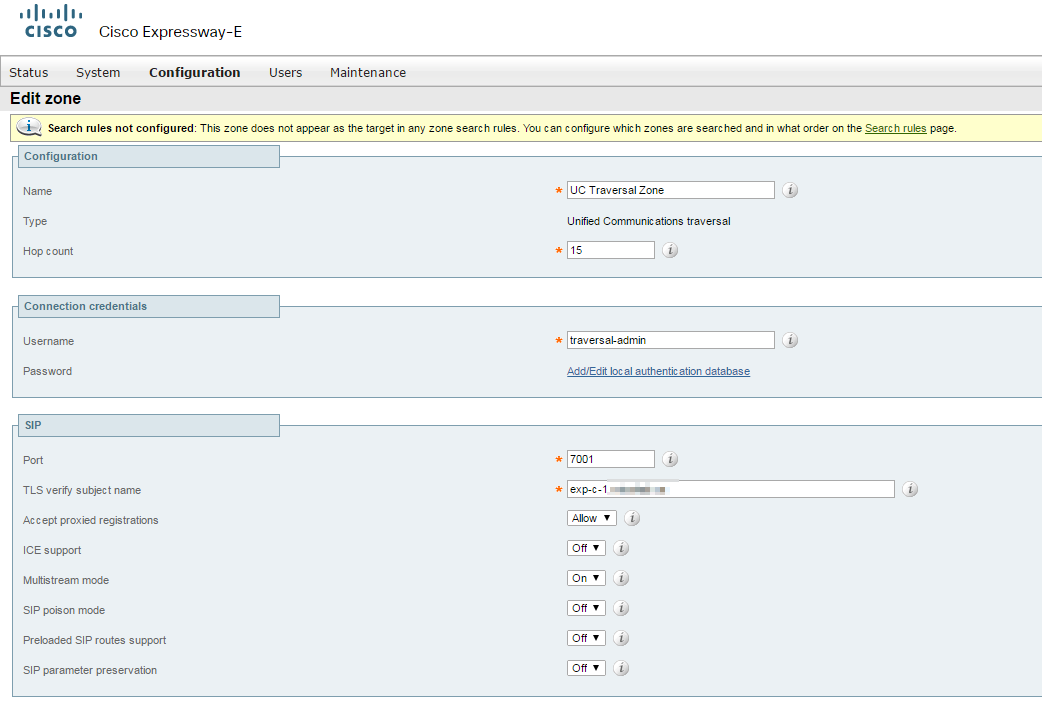
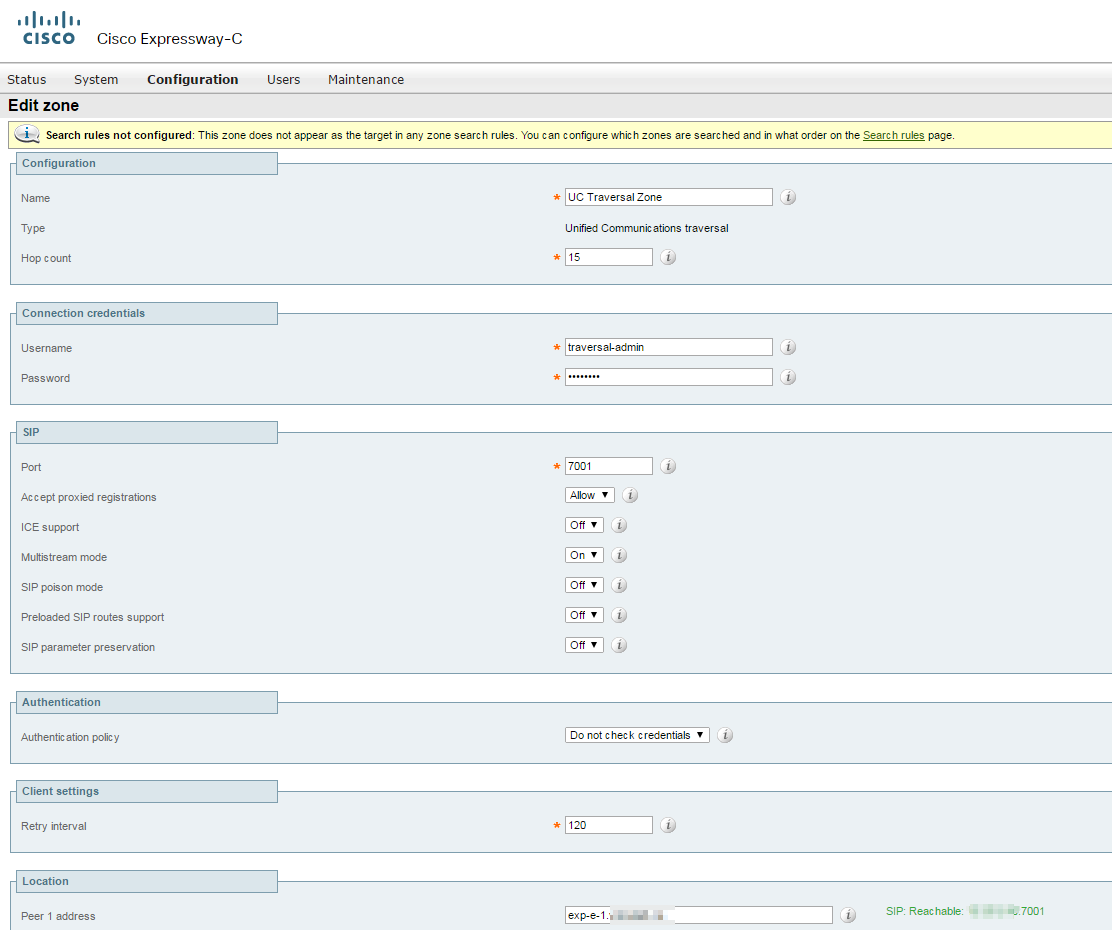
Expressway-C for Unified Communications

Secure Traversal between Expressway-E and Expressway-C
Contact Photo Resolution
When Cisco Jabber is running in remote mode through MRA, the Corporate Directory and contact source type is automatically set to UDS. There is no additional configuration required for this behavior to function.
A webserver has been configured to host contact photos at the following URL:
http://Ad1.YOURDOMAIN.COM/directory/
Upload Jabber-Config.xml
<config>
<Policies>
<EnableSIPURIDialling>True</EnableSIPURIDialling>
<File_Transfer_Enabled>True</File_Transfer_Enabled>
</Policies>
<Client>
<enablesavechathistorytoexchange>True</enablesavechathistorytoexchange>
<InternalExchangeServer>ad1.yourdomain.com</InternalExchangeServer>
<Persistent_Chat_Enabled>true</Persistent_Chat_Enabled>
</Client>
<Directory>
<SipUri>mail</SipUri>
<UseSIPURIToResolveContacts>true</UseSIPURIToResolveContacts>
<BDISipUri>mail</BDISipUri>
<BDIUseSIPURIToResolveContacts>true</BDIUseSIPURIToResolveContacts>
<BusinessPhone>telephoneNumber</BusinessPhone>
<UDSPhotoURIWithToken>http://ad1.yourdomain.com/directory/%%uid%%.jpg</UDSPhotoURIWithToken>
</Directory>
</config>
Verify:
http://ucm-pub.YOURDOMAIN.COM:6970/jabber-config.xmlHTTP Server Allow List

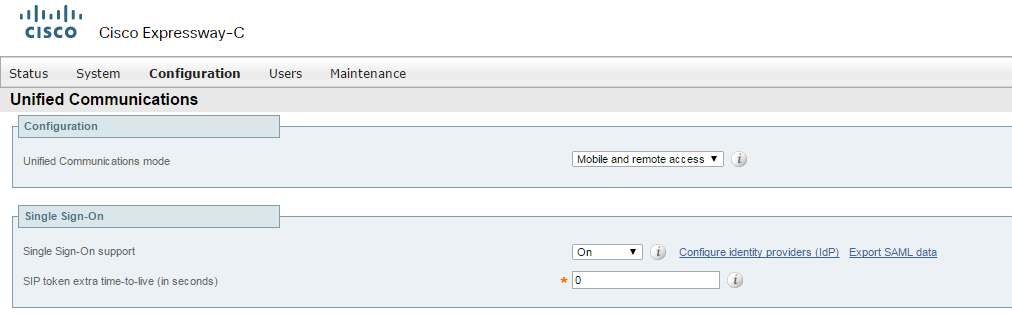
SAML Single Sign-On (SSO) Inside the Network

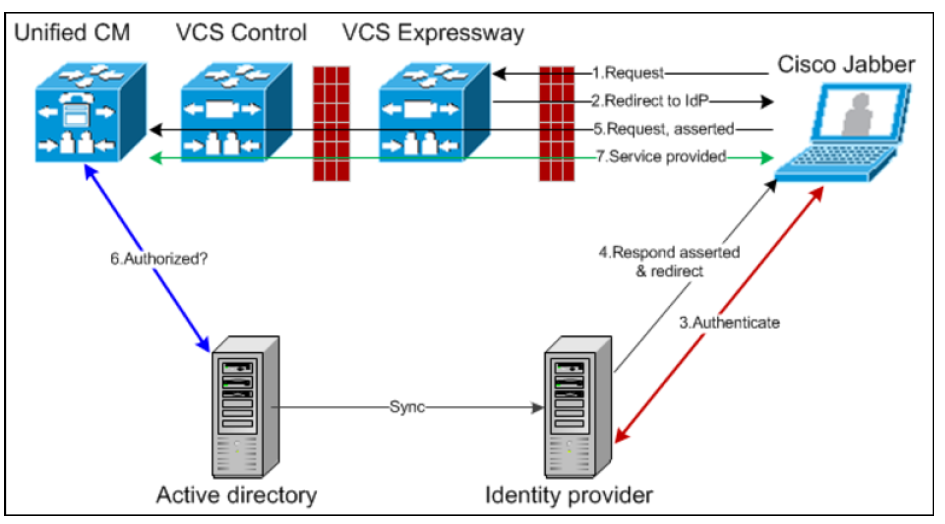
IdP Configuration
The Federation Metadata Explorer is an online tool that will retrieve the federation metadata document from your AD FS service and display the contents in a readable format.
In general, the ADFS metadata is here:
https://server/FederationMetadata/2007-06/FederationMetadata.xml
You can just save the file.
Upload Metadata:
In general, the ADFS metadata is here:
https://server/FederationMetadata/2007-06/FederationMetadata.xml
You can just save the file.
Upload Metadata:

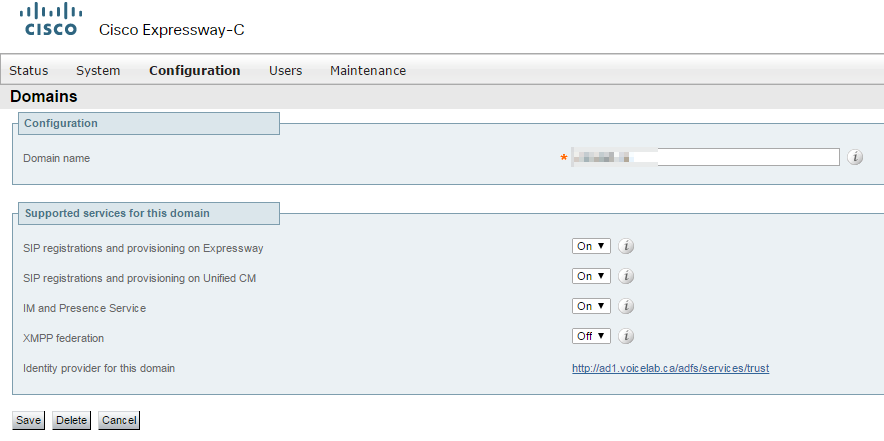
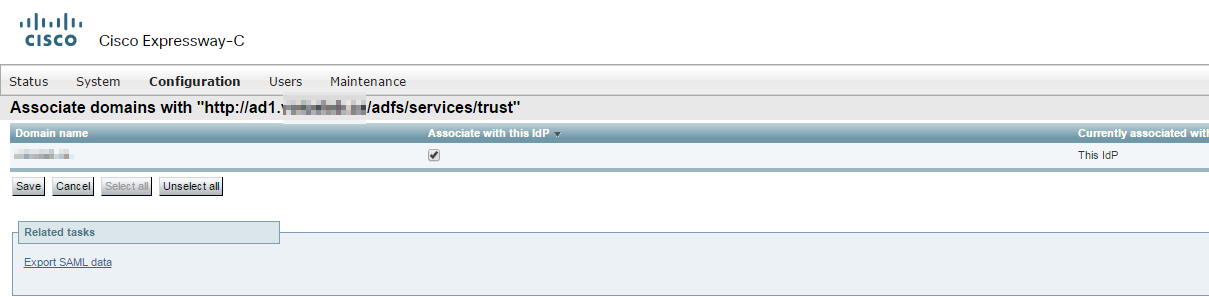
Assign Domain for IdP
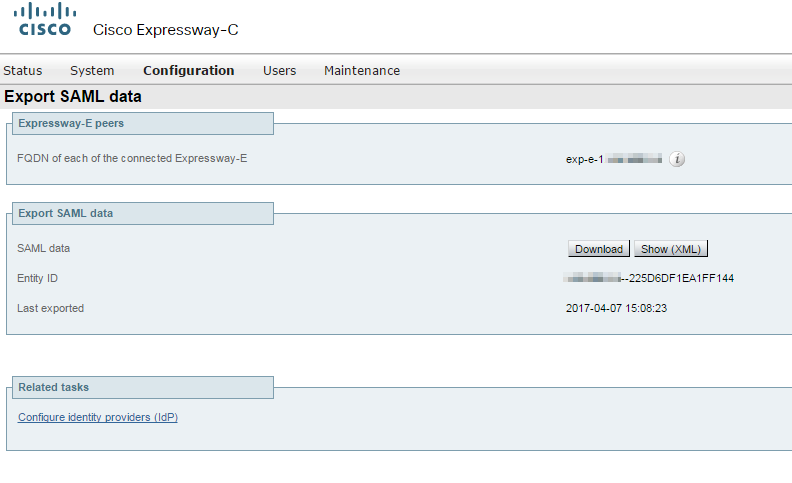
Export SP Metadata from Expressway-C
Add a Relying Party Trust for Cisco Expressway-E
A trust can be created by importing "federation metadata", that is, data that describes a Relying Party or Claims Provider and allows for easy creation of the corresponding trust. A federation metadata document is an XML document that conforms to the WS-Federation 1.2 schema. Federation metadata may be imported from a file, or the partner may make the data available via https.
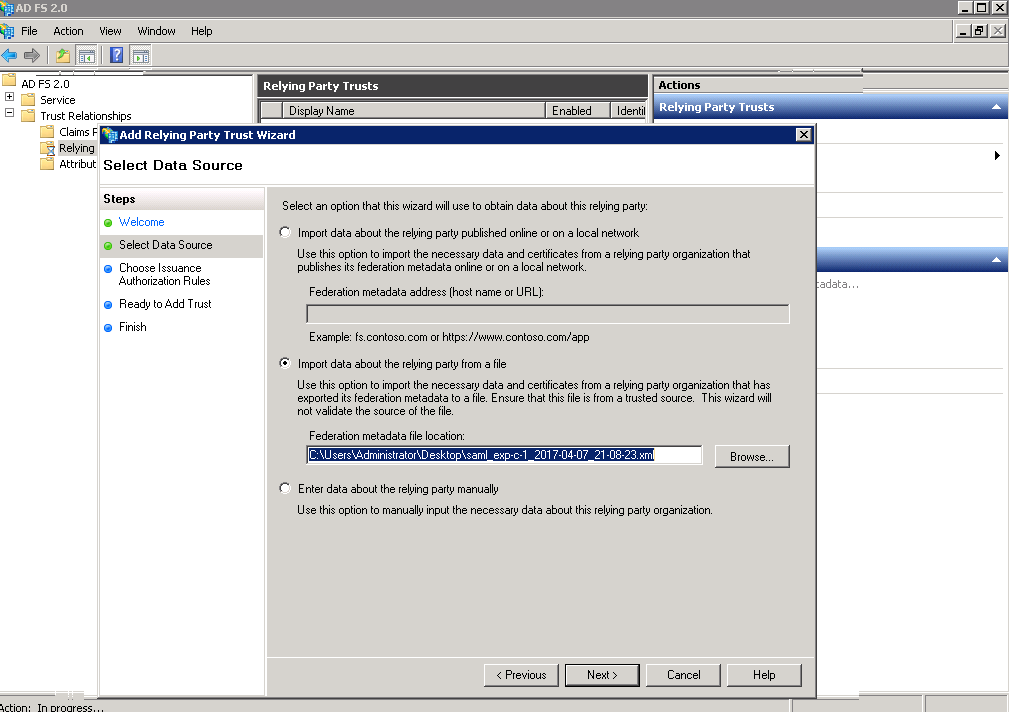
This information includes the URLs for the WS-Federation Passive protocol and\or the SAML 2.0 Web SSO protocol, one or more relying party identifiers and, typically, the X.509 Certificate used to encrypt any claims sent to the relying party. This essentially maps specific LDAP attributes from an attribute store that you define to a set of outgoing claims that can be used for authorization.
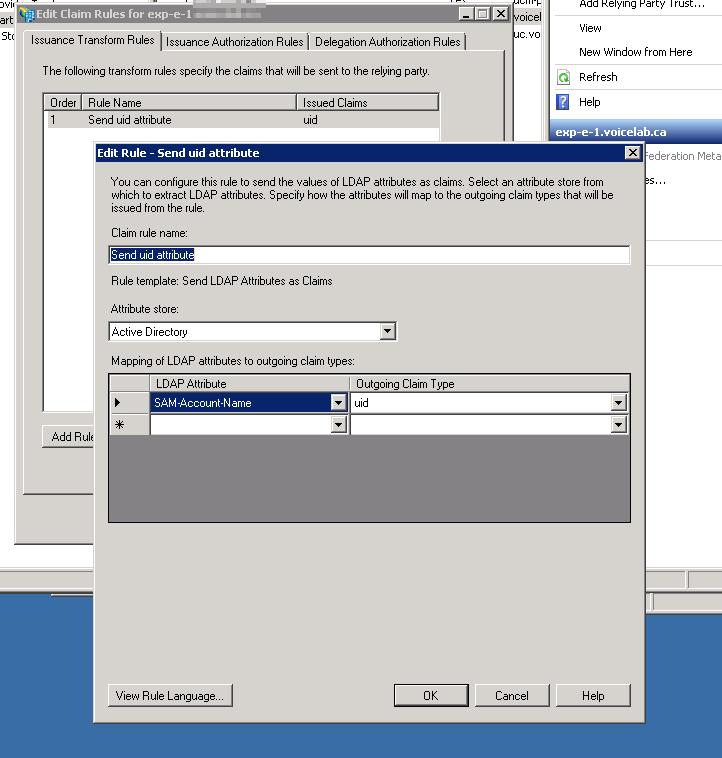
Set Relying Party Trust Properties for Expressway-E
In ADFS you configure a relying party trust to tell ADFS where it can expect claims to come from - it will trust the relying party so that when a user is authenticated they can be redirected back to that application (you don't want to give a user a token to present to an application you do not trust).
Right click the icon for the Windows PowerShell in the task bar and click Import system modules to launch Windows PowerShell with system module commands for AD FS.
Right click the icon for the Windows PowerShell in the task bar and click Import system modules to launch Windows PowerShell with system module commands for AD FS.
Copy and paste the following command text and then press Enter.
Set-ADFSRElyingPartyTrust -TargetName "exp-e-1.YOURDOMAIN.COM" -SAMLResponseSignature MessageAndAssertion -SignatureAlgorithm http://www.w3.org/2000/09/xmldsig#rsa-sha1
A succesful command will result in NO return data as shown below.
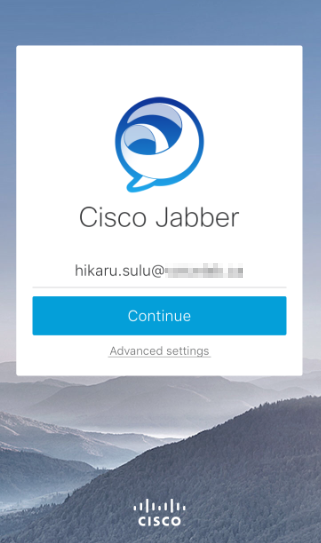
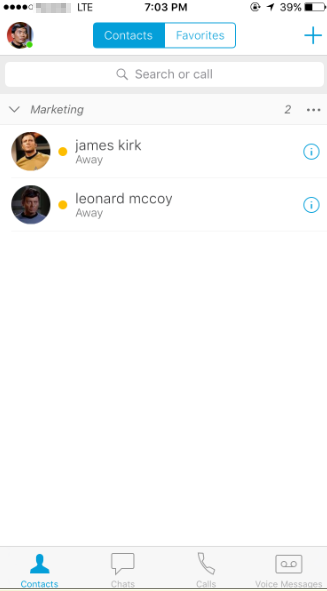
Jabber off-net login through mobile phone

No comments:
Post a Comment