Jabber Persistent Chat and Managed File Transfer
Persistent Chat
Instant messaging is an important communication option that lets you efficiently interact in today's multitasking business environment. Cisco Unified Presence provides personal chat, group chat, and persistent chat capabilities so you can quickly connect with individuals and groups and conduct ongoing conversations.
Personal and Group chat have been available for some time without any special configuration however these interactions are temporary (are deleted when all participants leave the chat.).
The Persistent Chat feature provides a richer set of capabilities allowing users to create permanent chat rooms and manage privacy and group membership settings. Persistent Chat offers users ongoing access to a discussion thread or other topic. It is available even if no one is currently in the chat and remains available until explicitly removed from the system.
Additional administrative configuration options were recently added to the Collaboration Systems portfolio including the ability to limit the creation of rooms to designated Group Chat Administrators.
Managed File Transfer
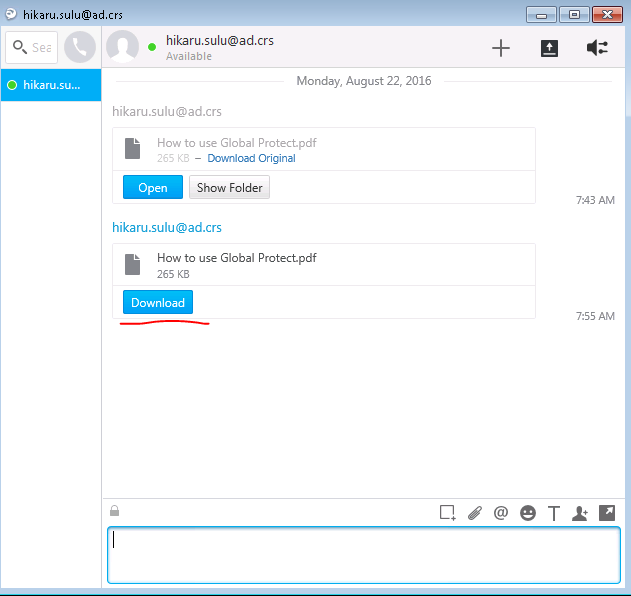
Managed file transfer (MFT) allows an IM and Presence Service client, such as Cisco Jabber, to transfer files to other users, ad hoc group chat rooms, and persistent chat rooms. The files are stored in a repository on an external file server using SSHFS to secure file transfer operations and the transaction is logged to an external database.
Unlike Peer-to-Peer file transfers, Managed File Transfer may be used in conjunction with Group and Persistent Chat to share files in a multi-user environment.
Installation of PostgreSQL Server 9.4.1
Edit the YUM Repository
For procedural documentation visit: https://wiki.postgresql.org/wiki/YUM_Installation
1. Log into the target CentOS 7 host with Root Privileges or as a user with sudo privileges.
2. To edit the YUM repository configuration file on CentOS type.
nano /etc/yum.repos.d/CentOS-Base.repo
3. Locate the [base] and [updates] section of the file and append the line exclude=postrgres*.

4. Save the file and exit the nano editor.
Download Installation Packages and Dependencies with YUM
1. Download the PostgreSQL server and package dependencies by typing:
yum localinstall http://yum.postgresql.org/9.4/redhat/rhel-7-x86_64/pgdg-centos94-9.4-1.noarch.rpm
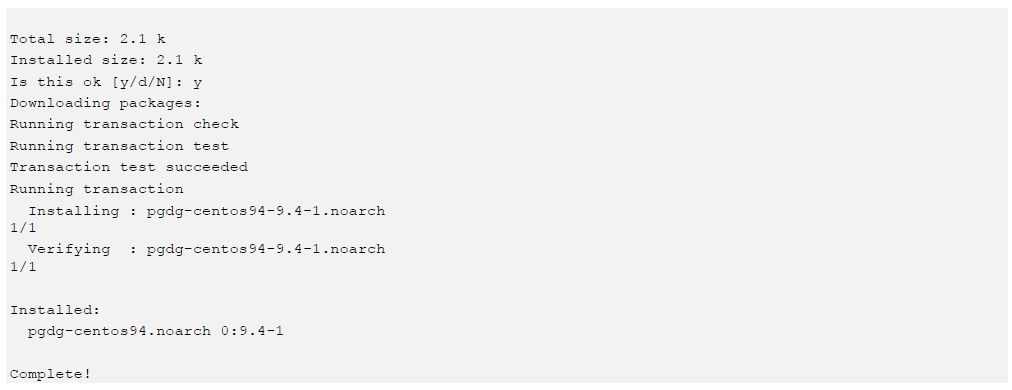
2. Observe the following output:
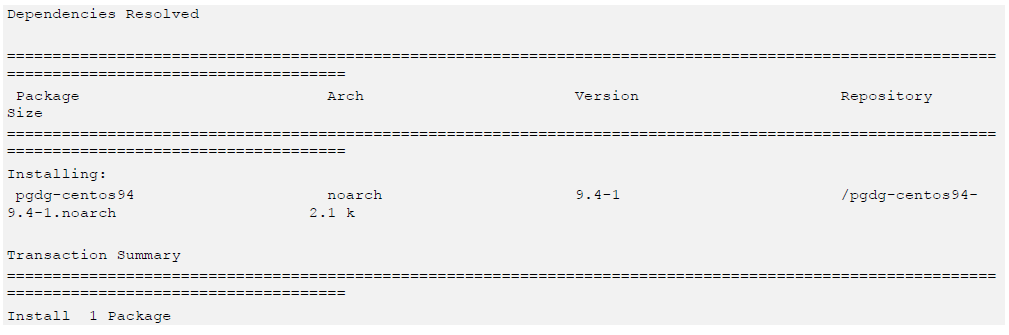
3. Check for a list of resolved packages and dependencies by entering the following command:
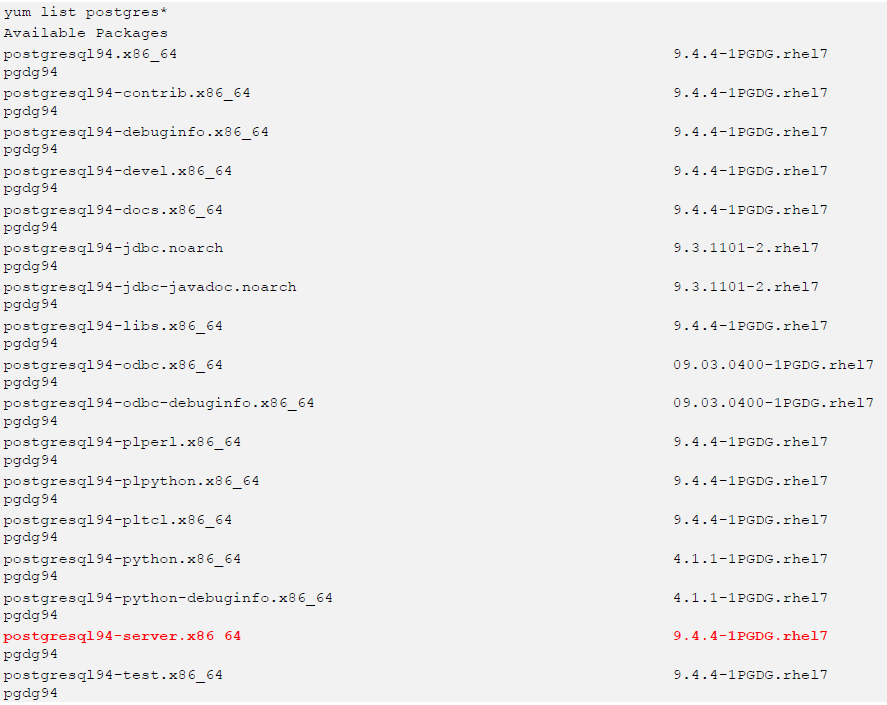
Note that postgresql94-serverx86_64 is returned as part of the command. We are ready to install the postgresql server software.
Install PostgreSQL Server 9.4.1 and Dependencies
1. Initiate the installation by issuing the following command:
yum install postgresql94-server
2. If PostrgreSQL 9.4.1 installation is successful, output should appear as follows (some output omitted).
Installed:
postgresql94-server.x86_64 0:9.4.4-1PGDG.rhel7
Dependency Installed:
postgresql94.x86_64 0:9.4.4-1PGDG.rhel7 postgresql94-libs.x86_64 0:9.4.4-1PGDG.rhel7
Complete!
Initialize PostgreSQL and Start Services
Next, we must initialize the Postgres SQL Server Software
1. Type the following command to initialize the PostgreSQL database with default parameters.
/usr/pgsql-9.4/bin/postgresql94-setup initdb
2. Confirm that the command returns the following result: Initializing database ... OK.
Enable Automatic Service Statrup
1. To enable automatic service startup with OS Boot, type the following command:
chkconfig postgresql-9.4 on
Start PostgreSQL Services
Services must be started for the first time to begin interacting with the software.
1. Type the following command to start the PostgreSQL server:
service postgresql-9.4 start
2. Output will appear as follows to indicate successful entry.
Redirecting to /bin/systemctl start postgresql-9.4.service
3. Check to ensure that the PostgreSQL process is actively running:
ps -ef | grep pgsql
4. At least one server process should be running as below:
postgres 8654 1 0 15:57 ? 00:00:00 /usr/pgsql-9.4/bin/postgres -D /var/lib/pgsql/9.4/data
5. Notice that the process is running as OS user postgres, which is automatically created during the package installation.
Configure Authentication and Access
Set the Password for Database User postgres
On Windows and OS X, the default password is postgres. However, on Linux systems, there is no default password set. This is required to gain superuser access to create and modify databases and users.
1. Switch User to postgres.
su postgres
2. Use the psql client utility to connect to the PostgreSQL instance which is accessible locally, as user postgres with no password.
psql postgres
3. Use the \password <username> command to the set the postgres user password.
postgres=# \password postgres
Enter new password: <yourpasswordhere>
Enter it again: <yourpasswordhere>
4. Quit the psql client utility by typing \q.
postgres=# \q
5. Exit the postgres user shell to return to Root.
Allow Local and Remote Connections via PW authentication by editing the pg_hba.conf
Use the following command to edit the authentication parameter file to enable password based authentication for local and remote connections.
1. Use the nano editor to make the following modifications to the pg_hba.conf file.
nano /var/lib/pgsql/9.4/data/pg_hba.conf
2. Items in bold red typeface where added/modified.
# TYPE DATABASE USER ADDRESS METHOD
# "local" is for Unix domain socket connections only
local all all md5
# IPv4 local connections:
host all all 127.0.0.1/32 md5
host all all 192.18.133.0/24 md5
# IPv6 local connections:
host all all ::1/128 md5
3. Pres Ctrl+Shift+X to exit and save when prompted.
Edit PostgreSQL Configuration File postgresql.conf
Modify the configuration to allow connections from remote hosts, confirm the TCP listening port, set global parameters required for integration with Cisco Unified IM and Presence.
1. Use the nano editor to make the following modifications to the postgresql.conf file.
nano /var/lib/pgsql/9.4/data/postgresql.conf
2. Edit the listen_addresses parameter by uncommenting and setting the value to ‘*’ to enable listening on all configured IP interfaces.
listen_addresses = '*'
3. Confirm that the TCP port is set to 5432.
port = 5432
4. Set the escap_string_warning and standard_confirming_strings values to off. This is a requirement for using PostgreSQL to provide external database services for Cisco Unified IM and Presence.
escape_string_warning = off
standard_conforming_strings = off
5. Restart PostgreSQL for configuration changes to take effect.
service postgresql-9.4 restart
Add a Firewall Rule in CentOS
The built-in firewall process in CentOS Linux iptables must be updated to permit incoming IP connections on TCP port 5432 in order for database connectivity between Cisco Unified IM and Presence and the PostgreSQL server.
1. Type the following command to make a permanent iptables permit for TCP/5432.
firewall-cmd --permanent --add-port=5432/tcp
2. Reload the iptables process to make the configuration changes effective.
firewall-cmd –reload
or you can disable Firewall
Pre-Flight Check
- These instructions are intended specifically for stopping and disabling firewalld CentOS 7.
- I’ll be working from a Liquid Web Self Managed CentOS 7 server, and I’ll be logged in as root.
Disable Firewalld
To disable firewalld, run the following command as root:
systemctl disable firewalld
Stop Firewalld
To stop firewalld, run the following command as root:
systemctl stop firewalld
PostgreSQL Database Setup
Launch the PSQL Client
1. Launch the psql utility by typing: psql –U postgres
2. At the Password prompt type: postgres
Create Database Users
3. Create the Persistent Group Chat database user with permissions by typing:
CREATE ROLE tcuser LOGIN CREATEDB SUPERUSER;
4. Press Enter.
5. Create the Managed File Transfer database user with permissions by typing:
CREATE ROLE mftuser LOGIN CREATEDB SUPERUSER;
6. Press Enter.
Create Databases
7. Create the Persistent Group Chat database tcmadb by typing:
CREATE DATABASE tcmadb WITH OWNER tcuser ENCODING 'UTF8';
8. Press Enter.
9. Create the Managed File Transfer database mftadb by typing:
CREATE DATABASE mftadb WITH OWNER mftuser ENCODING 'UTF8';
10. Press Enter.
11. Confirm database creation by typing :
\list
12. Press Enter.
13. Confirm that both the tcmadb and mftadb databases are listed in the command output.
Set DB User Passwords
14. Set the password for tcuser by typing:
ALTER ROLE tcuser WITH PASSWORD 'tcuser';
15. Press Enter.
16. Set the password for mftuser by typing:
ALTER ROLE mftuser WITH PASSWORD 'mftuser';
17. Press Enter.
Set Persistent Chat Database Parameters
18. Type the following to connect to the tcmadb (Persistent Chat Database) as the postgres user.
\connect tcmadb
19. Press Enter. Observe the status message: You are now connected to database "tcmadb" as user "postgres".
20. Type the following to create a required function:
CREATE FUNCTION plpgsql_call_handler () RETURNS LANGUAGE_HANDLER AS '$libdir/plpgsql' LANGUAGE C;
21. Press Enter. Confirm that command output matches the graphic below.
Set Managed File Transfer Database Parameters
22. Type the following to connect to the mftadb (Managed File Transfer Database) as the postgres user.
\connect mftadb
23. Press Enter. Observe the status message: You are now connected to database "mftadb" as user "postgres".
24. Enter the password postgres to authenticate.
25. Type the following to create a required function:
CREATE FUNCTION plpgsql_call_handler () RETURNS LANGUAGE_HANDLER AS '$libdir/plpgsql' LANGUAGE C;
26. Press Enter. Confirm that command output matches the graphic below.
27. Command Success Output

28. Type the following command to quit the psql session:
\q
29. Press Enter.
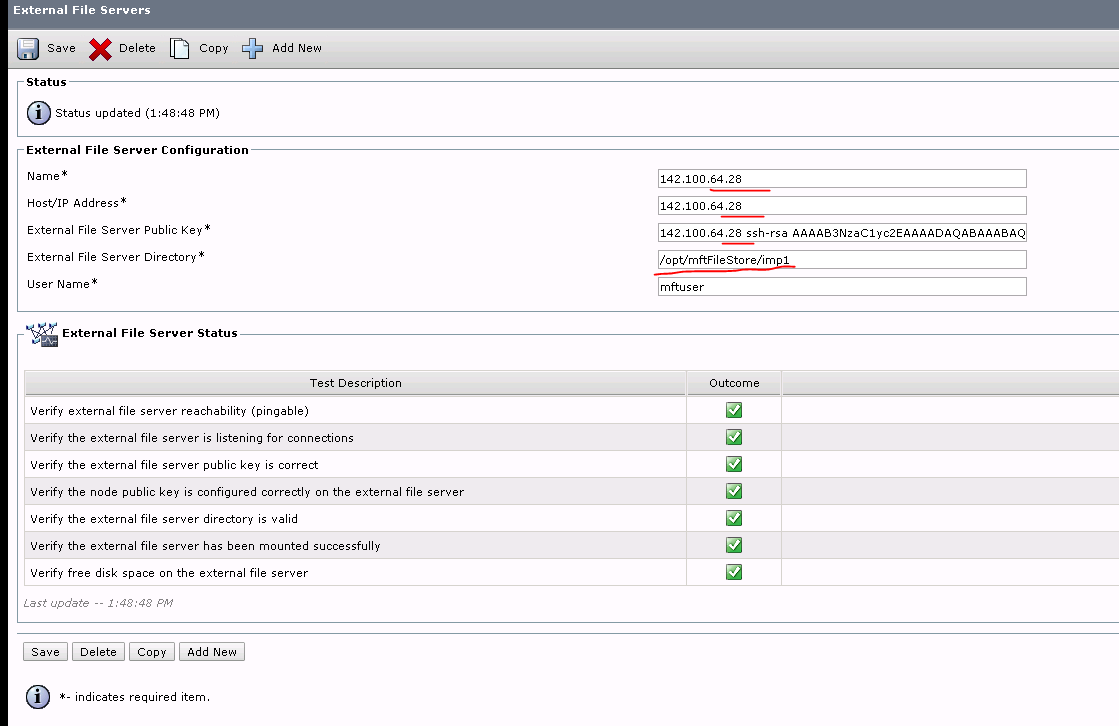
Set Up External Database Entries on the IM and Presence Service


Set Up an External File Server for MFT
Type the following command to search the /etc/ssh/sshd_config file for the values described above.
cat /etc/ssh/sshd_config | grep Authentication
Press Enter.
Multiple lines are returned however, the output depicted in the graphic indicates that the default value of these two parameters is set to yes.
Add and Configure a User for Managed File Transfer
Type the following command to create a user name mftuser:
useradd -m mftuser
Press Enter.
Switch to the mftuser by typing:
su mftuser
Press Enter.
Create a .ssh directory under the mftuser home directory that is used as a key store by typing:
mkdir ~mftuser/.ssh/
Press Enter.
Create an authorized_keys file under the .ssh directory that is used to hold the public key text for each IM and Presence Service node. Type the following:
touch ~mftuser/.ssh/authorized_keys
Press Enter.
Set the correct permissions for passwordless SSH to function by typing the following commands. Press Enter after each command.
chmod 700 ~mftuser
chmod 700 ~mftuser/.ssh/
chmod 700 ~mftuser/.ssh/authorized_keys
Type exit to return to the root shell.
Create a Directory Structure for MFT
Next, we will create a file directory structure where files transferred using the MFT feature will be stored. We will ensure that the user created in the previous step has ownership and the permissions needed to read, write, and delete files.
To create a top-level directory named mftFileStore to hold sub directories for all of the IM and Presence Service nodes that have managed file transfer enabled. Type the following:
mkdir -p /opt/mftFileStore/
Press Enter.
Give ownership of the newly created /opt/mftFileStore directory to user mftuser.
chown mftuser:mftuser /opt/mftFileStore/
Press Enter.
Specify directory permissions that permit Read, Write, and Execute by the mftuser account only by typing:
chmod 700 /opt/mftFileStore/
Press Enter.
Create a subdirectory under /opt/mftFileStore/ for each managed file transfer enabled node. In our case, this is 142.100.64.15. Type the following commands one per line and press Enter after each:
su mftuser
mkdir /opt/mftFileStore/imp1
To verify the previous exercise enter the following commands and compare the output with the graphic provided. Commands are entered one per line and the Enter key should be pressed after each.
ls -al ~/.ssh/
ls -al /opt/mftFileStore/
Confirm that the output displayed in PuTTY matches the highlighted lines in the graphic. This validates that all required files and directories have been created and assigned permissions correctly.
Obtain the Server Public Key
In order to implement key-based SSH authentication for the mftuser for file transfers between centos.dcloud.cisco.com and imp1.dcloud.cisco.com, both servers will need to be aware of the Public Key provided by the other. In this step, we will obtain the Public Key of the MFT server, which will be provided to imp1.dcloud.cisco.com during the configuration process.
1. Obtain the public key of the centos.dcloud.cisco.com file server by typing:
ssh-keyscan -t rsa centos.dcloud.cisco.com
2. Press Enter.
3. Copy the result of the ssh-keyscan command. Highlight the desired text and left-click the mouse to copy the selection to the buffer. Be certain to copy the entire key value, from the server hostname, FQDN, or IP address to the end. Consult the graphic below for reference.
Configure Persistent Group Chat

Check Persistent Chat Database Connectivity

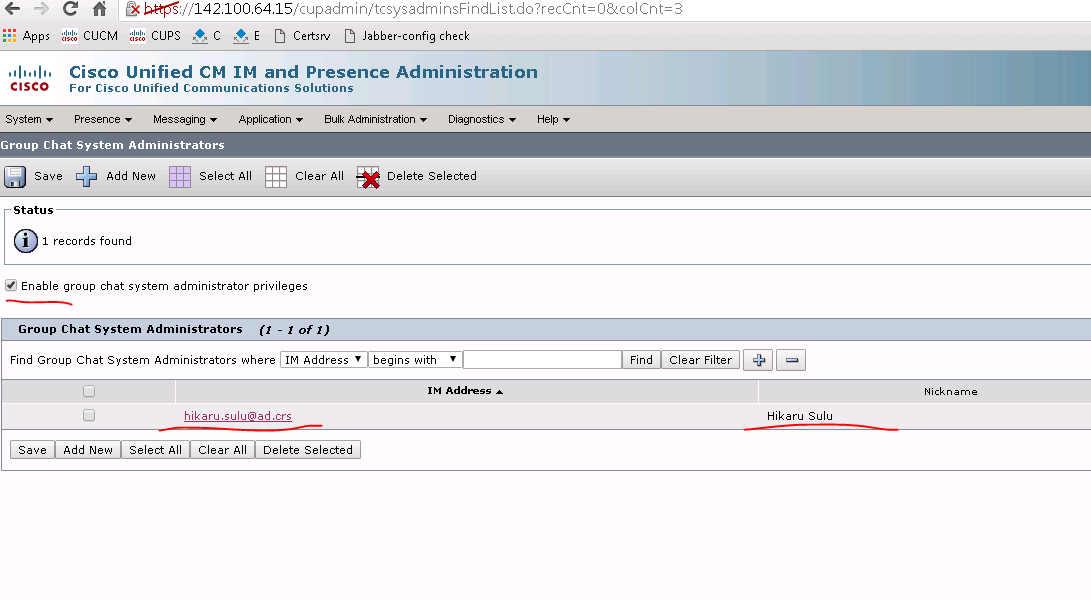
Assign Group Chat Administrator Privileges
Upload Jabber-Config.xml
<config version="1.0">
<Policies>
<EnableSIPURIDialling>true</EnableSIPURIDialling>
<VoiceServicesDomain>fcl.ca</VoiceServicesDomain>
</Policies>
<Client>
<Persistent_Chat_Enabled>True</Persistent_Chat_Enabled>
</Client>
<Directory>
<SipUri>mail</SipUri>
<UseSIPURIToResolveContacts>true</UseSIPURIToResolveContacts>
<BDISipUri>mail</BDISipUri>
<BDIUseSIPURIToResolveContacts>true</BDIUseSIPURIToResolveContacts>
<BusinessPhone>ipphone</BusinessPhone>
<UDSPhotoURIWithToken>http://www.ad.crs/%%uid%%.jpg</UDSPhotoURIWithToken>
</Directory>
</config>
Restart IM and Presence Services
Cisco XCP Text Conference Manager.
Cisco XCP Router

Configure Managed File Transfer
While Peer-to-Peer file transfer between Jabber clients has been available for some time, Managed File Transfer is new feature introduced beginning with the Jabber 10.6 client with Collaboration System release 10.5(2).
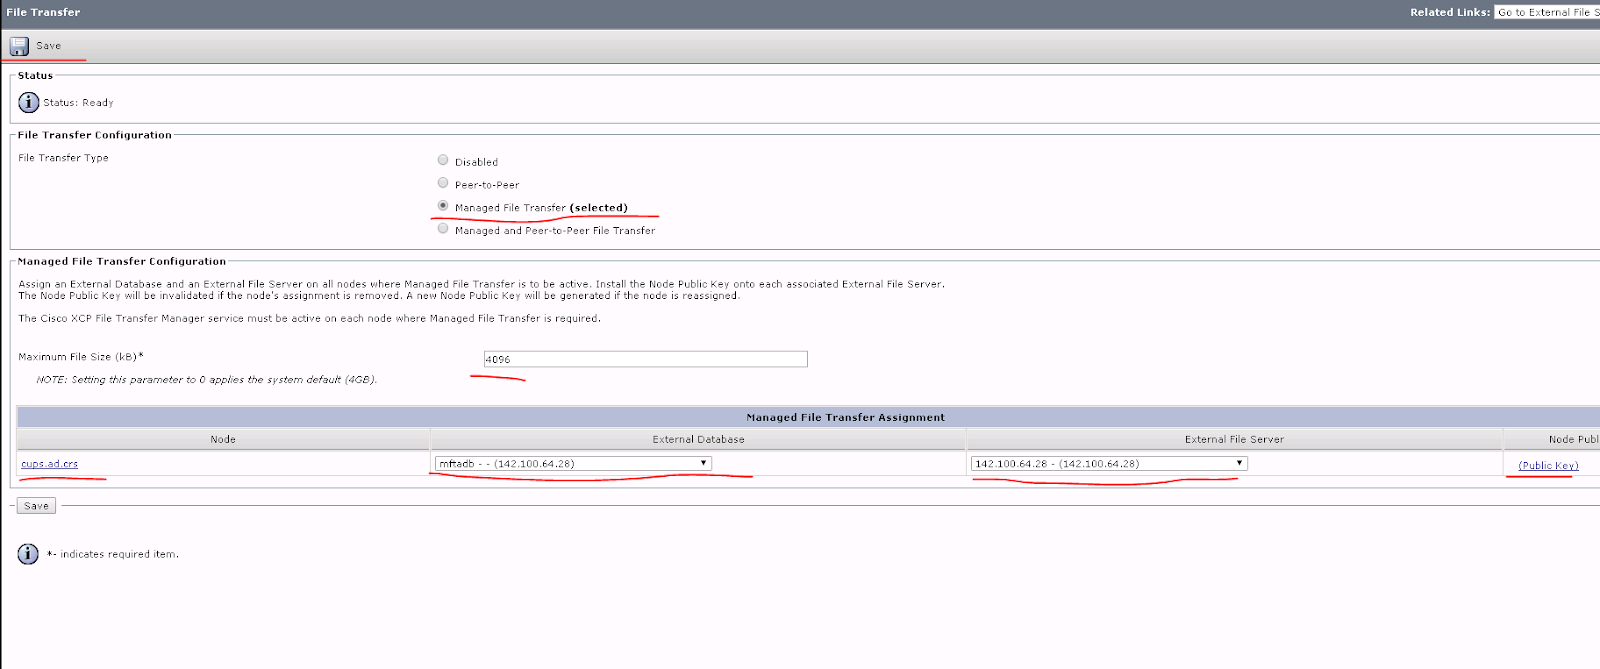
Managed File Transfer provides the following key capabilities:
• Support for File Transfer operations in Group Chat/Persistent Chat Rooms
• Compliance and Policy Control for File Transfers
• Administrative control of maximum file transfer size
Enable Managed File Transfer in Unified IM and Presence
[mftuser@localhost 20]$ ssh-keyscan -t rsa 142.100.64.28
# 142.100.64.28 SSH-2.0-OpenSSH_6.6.1
142.100.64.28 ssh-rsa AAAAB3NzaC1yc2EAAAADAQABAAABAQDKHU4Mgmt/YoueRH2NL39WV+CoOTRnUSV75pqS/CkbkCFVpdKNLluphMA/z5kle8eHBk4dmBY8ZYiAeQgyELdhBHn33luUHkbaN9UMBFFz9MPjIoFpCv4DdKF58fQXs3hHygIqGmlSPDeEN8NVGrMshmrmgXcfrFC/rryXt+IEkeXT+vhGn0OEaqpW4XSPIh2OAmLEiG67uZBdDG7PizVYm1bKrCpoTkAl7ujxc1mWJjC/zXKhkp/1RxJnM2TfBbaFZkRqbBLxXqQYupL9FQYwVoOlyi2sO7VJI2KpE31SDKReUMkNXVsaX8N+PwdimhTWC29eYcXWY3Te/o1bHdM7

Click Close to exit the View Node Public Key dialog.
Switch focus to the PuTTY session currently connected to centos.dcloud.cisco.com. (left open from earlier in this module)
Ensure that you are logged on as user mftuser. To check type the following command followed by the Enter key.
whoami
If the result is anything other than mftuser, type su mftuser, followed by the Enter key, otherwise move on to the next step.
Use the nano editor to add the Public Key of the imp1.dcloud.cisco.com IM and Presence node to the authorized_keys file created earlier by typing:
nano /home/mftuser/.ssh/authorized_keys
Right click the mouse anywhere inside the PuTTY console to paste the contents of the copy buffer into the editor. The output should be similar to the graphic below.
cat /home/mftuser/.ssh/authorized_keys
[mftuser@localhost 20]$ cat /home/mftuser/.ssh/authorized_keys
ssh-rsa AAAAB3NzaC1yc2EAAAABIwAAAQEA4pC+ic6tIrFPeoSiOlcxkHcSlkTdzEJQdSogw6RdzIljvmuXq+mqvJvfeZhgGEQk8TpocHMVXWocP5CO0xZfx9xyxAmQ7yCbgeW604+FNaA+1n8EdCCnPa4KsRKgTQh+OoEKH4wpRUrwRVlxG83xdv7w7j0ibrPOs5CAzYQs3hmOjr6d4HO/+vXV256zSScNZAOAQSgrqQ54koWD/V3s76arkhn4gAnuUv5ot2VgwtFkFSPqsXeo4Ocrn+6JElc2hwip3yZYCYqcktxehWQd7dXrYYMCyIpzTJY6JTfSgzumHTuguo1yoeC4ePTZ4+Qrk4MUjiPGN6S/wsc45Whqfw== imp@cups.ad.crs
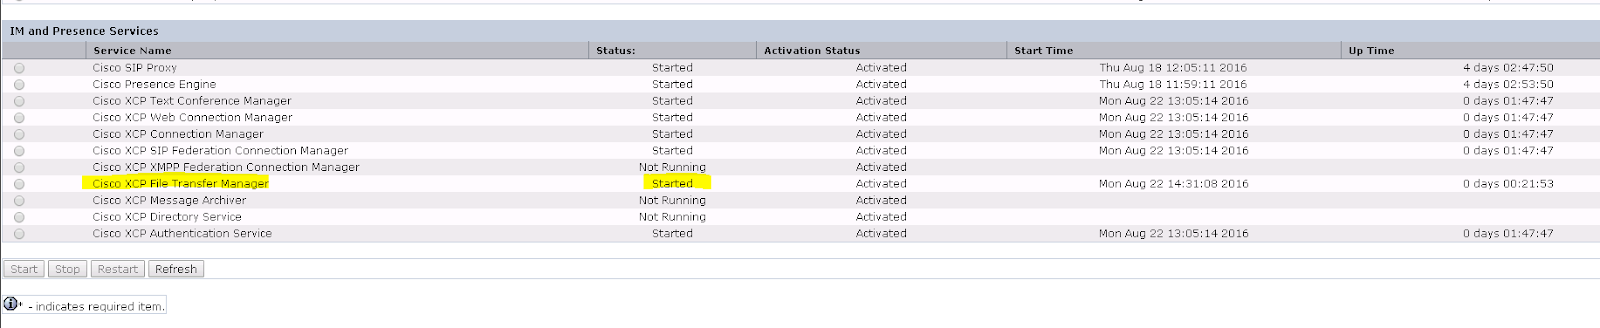
Activate the XCP File Transfer Manager Service

thanks a lot
ReplyDeletethis page helps me to fix my problem with MFT
its awesome
Perfect post!
ReplyDelete