Module 7 – Cisco TMS Smart Scheduling and Collaboration Meeting Room LAB
(Estimated time: 30mins)
Firmware used in this Lab
Cisco TMSPE 1.2 Alpha 10
Cisco TMS 14.3.2
Cisco Unified CM 10.0
Telepresence Conductor XC2.3
Introduction
Cisco TMS Provisioning Extension (Cisco TMSPE) is an application for Cisco TMS that offers the following features for telepresence users and administrators:
Cisco TMS Provisioning Extension (Cisco TMSPE) is an application for Cisco TMS that offers the following features for telepresence users and administrators:
- SmartScheduler, a web-based telepresence scheduling tool for end users.
- Collaboration Meeting Room, personal telepresence bridges for unscheduled meetings.
Cisco TMSPE provides both administrator configuration and end user interfaces for these features. End users can access Collaboration Meeting Room and Smart Scheduler in a common portal.
Early Field Trial disclaimer
Many of the new features described herein remain in varying stages of development and will be offered on a when-and-if-available basis. The features in the EFT and any future product release are subject to change at the sole discretion of Cisco. Accordingly, Cisco will have no liability for delay in the delivery or failure to deliver any future products or features described in this document and any such delay or failure would not in any way imply the right to return any previously purchased Cisco products.
Many of the new features described herein remain in varying stages of development and will be offered on a when-and-if-available basis. The features in the EFT and any future product release are subject to change at the sole discretion of Cisco. Accordingly, Cisco will have no liability for delay in the delivery or failure to deliver any future products or features described in this document and any such delay or failure would not in any way imply the right to return any previously purchased Cisco products.
As the Lab was created using a combination of both FCS and EFT code. In the interest of time, the above firmware was pre-installed and upgraded to the stated firmware versions.
Therefore skip Parts 1 and 2, proceed straight to Part 3.
For Knowledge
Part 1: Install TMS 14.3.2 and add it to uclab.com domain (done)
Part 2: Upgrade TMSPE 1.1 to TMSPE 1.2 (done)
Your Lab Begins Here!
Part 3: Enable TMSPE (begin from here)
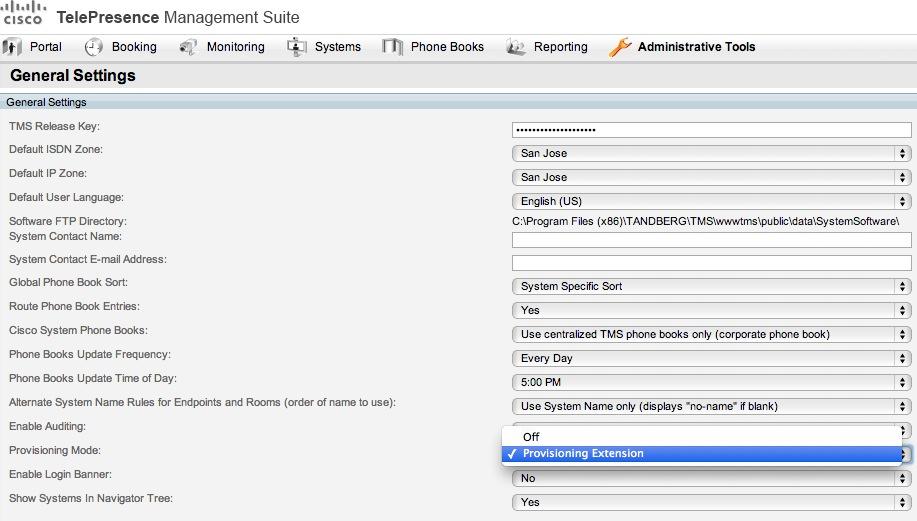
1. In Cisco TMS, go to Administrative Tools > Configurations > General Settings, set the field Provisioning Mode to Provisioning Extension and click Save. You may need to refresh the browser window or empty the browser cache after making this selection.
- Go to Administrative Tools > Activity Status to verify that the switch is completed.
- Go to Administrative Tools > Provisioning Extension Diagnostics, look for any alarms raised and click Run Health Check. If any alarms are raised, click them to see details and perform the corrective actions described.
Part 4: Setting up Users
This section describes the required procedures to configure Cisco TMSPE for provisioning.
Creating groups and adding users
Users can be added to Cisco TMSPE by importing from an external directory, or manually adding individual users. Before users can be added, you must set up a group hierarchy.
Setting up groups
Whenever you add users manually or import users from external sources into a particular group, the users inherit all settings that are assigned to the group. Any settings not assigned at the group level are inherited from the parent group.
To add a group:
1.In Cisco TMS, go to Systems > Provisioning > Users.
- In the Users and Groups container, click the parent of the group you want to add.
- Above the explorer view, click Add Group. The Add Group dialog box is displayed.
- In the Display Name field, enter a name for the group.
- Click Save.
You can now import users into the group from an external directory, or add users manually.
- In Cisco TMS, go to Systems > Provisioning > Users.
- In the Users and Groups container, navigate to and click the group into which you want to import user accounts.
3. In the User Import pane, click Configure.
4. If you want to copy user import settings from the parent group as a starting point, click Copy from parent.
5. In the Type field, select the type of external directory from which you are importing user data. Configuration fields will be displayed based on the type of external directory you choose to import from. The screenshot below shows the fields available for Secure AD:

6. In the fields provided, specify the information that Cisco TMSPE requires to contact the external directory. Configure the fields according to the following table:
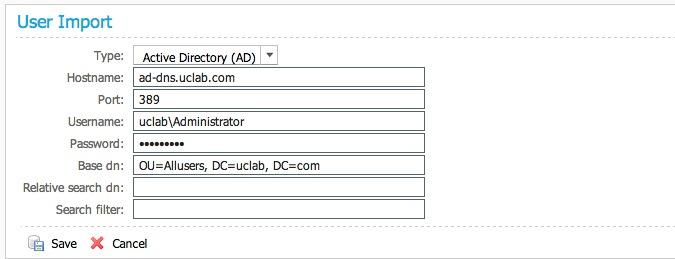
Password: C1sc0123
Checking Active Directory connection settings
To check the connection settings and make sure the filter template is appropriate for what you want to import:
1. Go to Administrative Tools > Configuration > Provisioning Extension Settings.
2. Scroll to the Active Directory Connection settings. Check the settings.

Part 5: Configuring and Sending Account Information
To simplify the distribution of account information to users, Cisco TMSPE provides an email function with a configurable email template that can be used to inform individual users or groups of their provisioning account settings and account details for functions such as FindMe.
Configuring email settings
1. To configure email settings:
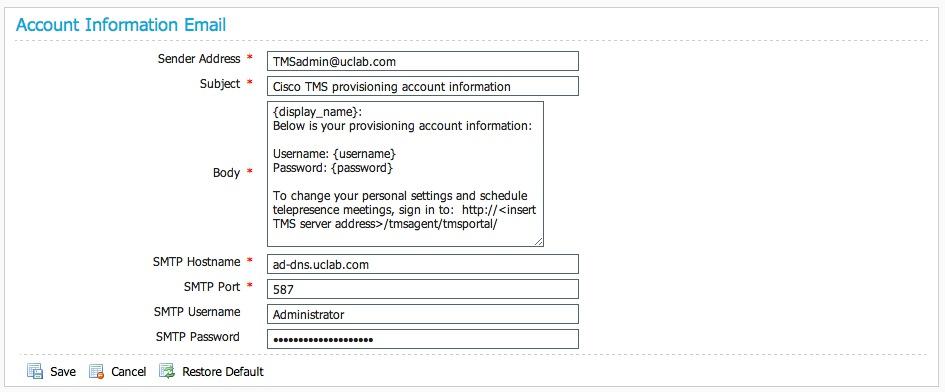
1. In Cisco TMS, go to Administrative Tools > Configuration > Provisioning Extension Settings.
2. In the Account Information Email pane, configure the fields as follows:
Part 6: Deploying Smart Scheduler
Smart Scheduler is a smart interface to Cisco TMS booking, using the Cisco TelePresence Management Suite Extension Booking API (Cisco TMSBA). It uses the same portal framework as the FindMe user portal.
The layout is scalable and touch-screen friendly.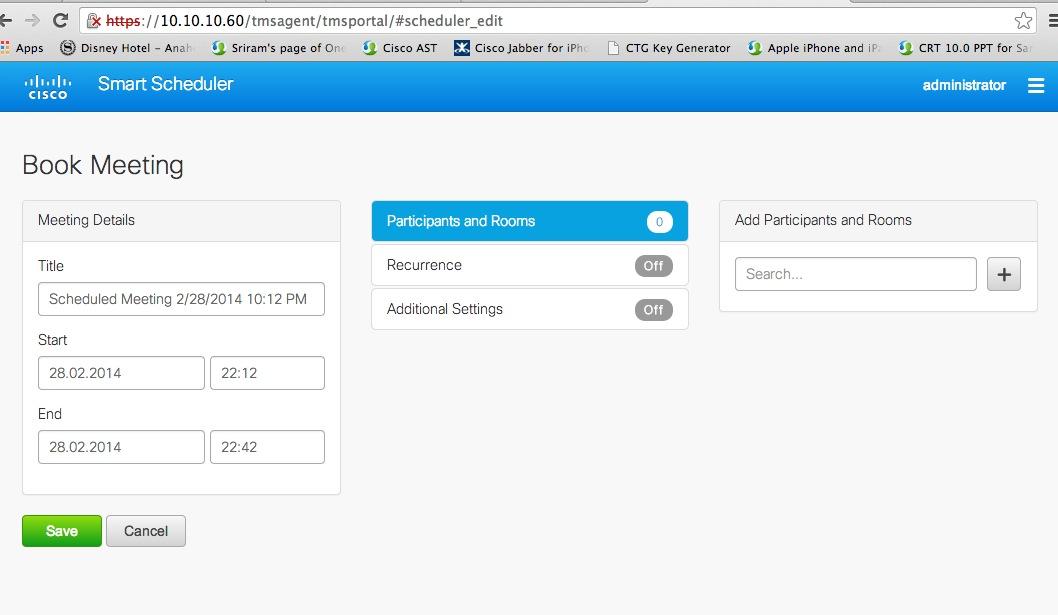
Smart Scheduler is a part of the WebEx Enabled TelePresence solution, allowing users to set up telepresence meetings with and without WebEx.
Users can book:
■ Telepresence rooms
Any bookable system in Cisco TMS can be scheduled directly.
■ Call-in participants
Any system that is not supported by Cisco TMS booking can be scheduled as a call-in participant, including devices provisioned by Cisco TMSPE.
Call-in participants must use SIP for video or SIP Audio.
User access to Smart Scheduler
Users with the necessary credentials can reach Smart Scheduler immediately on:
http://<Cisco TMS server address>/tmsagent/tmsportal/#scheduler
Users who already use Cisco TMS can also click the portal icon in the upper right corner to go to Smart Scheduler and FindMe:
How Smart Scheduler works
When a domain user signs into Smart Scheduler and books a meeting, the request is passed to Cisco TMS.
This communication goes through the Cisco TelePresence Management Suite Extension Booking API (Cisco TMSBA).
The Cisco TMS user entered during installation of Cisco TMSPE is the service user for Smart Scheduler. This user creates the booking in Cisco TMS on behalf of the Cisco TMSPE user.
If the Cisco TMSPE user does not already exist in Cisco TMS, it will be created at the same time as the booking.
When the booking is complete, Cisco TMS sends an email confirmation to the user who booked the meeting. The message containing meeting details including route, scheduled systems, WebEx information, and so on, may then be forwarded to the other meeting participants.
Cisco TMS also sends email to the service user for Smart Scheduler when a booking is created or updated.
Part 7: Deploying Collaboration Meeting Rooms
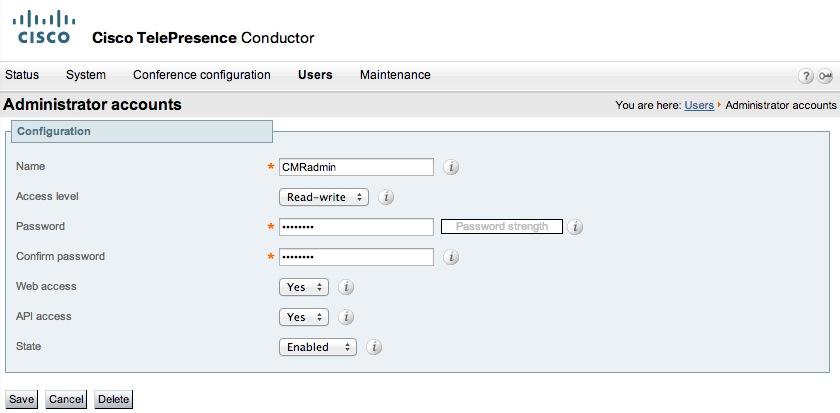
1. Connect to the TelePresence Conductor to create a new Administration User
2. In the Administrator Account pane, create a new user and configure the fields as follows:
Connecting TMS to the Telepresence Conductor
To register the New Conductor, return to TMS -> Systems -> Provisioning -> Users, Click Telepresence Conductor Settings
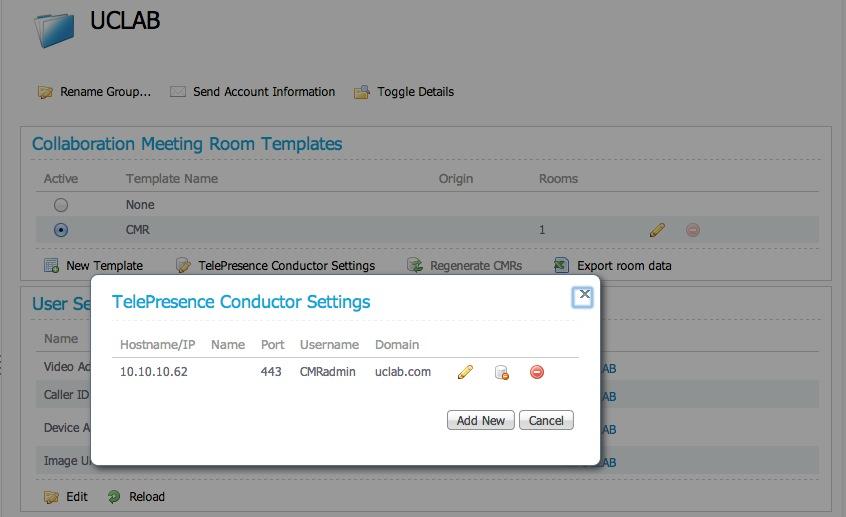
Fill in the credentials you created for Telepresence Conductor
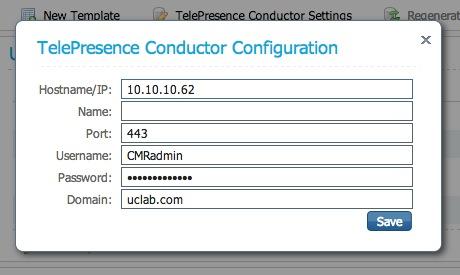
Password: C1sc0123
Part 8: Creating Templates
Settings for Collaboration Meeting Room must be configured on a per-group level. The settings are configured by assigning templates to groups.
To create a template:
1. Go to Systems > Provisioning > Users > CMR and click New.

2. Fill in the settings:
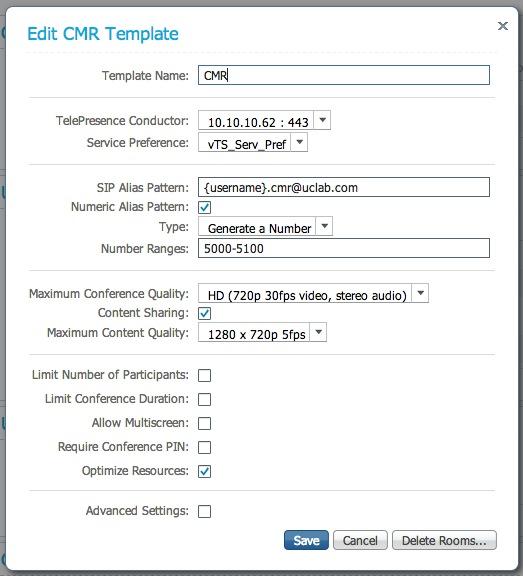
3. Click Save
Applying templates to groups
In Cisco TMS:
1. In Systems > Provisioning > Users, go to the group to which you want the template applied.
2. Select the radio button for the template you want in the Active column.
The template will be applied immediately and a notification will be displayed.
All users in the group can now create their own Collaboration Meeting Room. Users may control the following:
■ whether to use a PIN, if you have not specified this as a requirement ■ what their room PIN will be, within the limitations you specify
■ a banner that is displayed when meeting attendees join their room
■ a banner that is displayed when meeting attendees join their room
CMR count
The number of rooms created with each template will be displayed in the Count column in the list of templates. Note that this count is the total for the template, regardless of which group is currently selected.
PART 9: Here comes the fun PART!
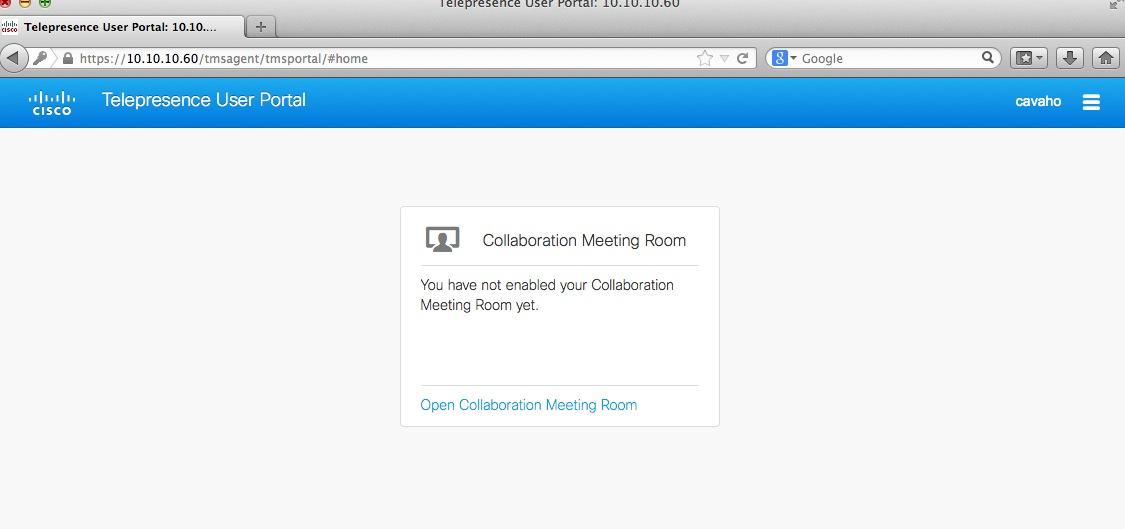
Setting up your CMR room
Open up another browser, and login to
Or in TMS: go to user and click edit CMR room.
When prompted with Username and password
Login with any of the TMS usernames, example
Username: Cavaho
Password: C1sc0123
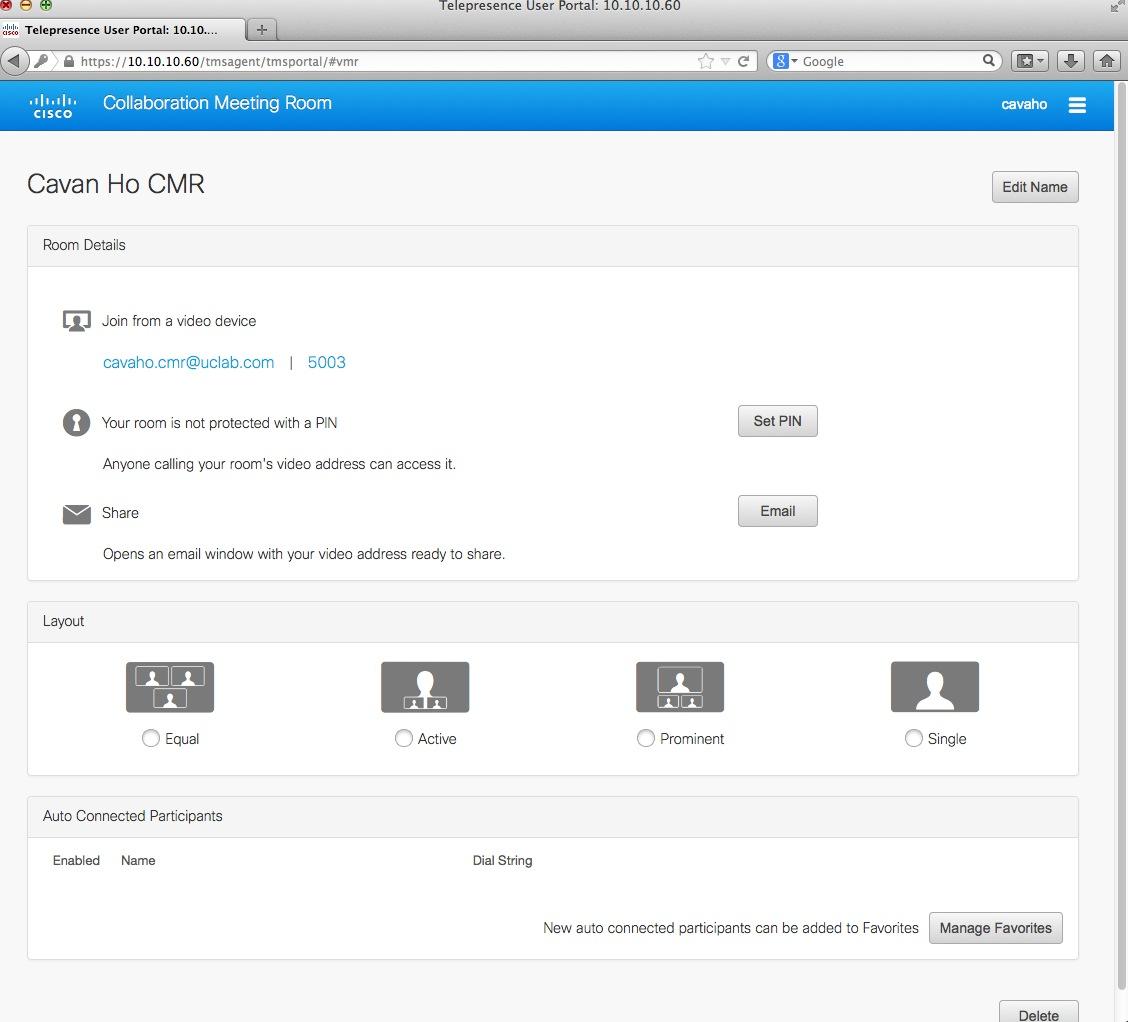
Follow through the wizard prompts to activate each user CMR
Then Dial into the CMR room based on the assigned CMR room number: 5003, using any of the EX60, or Jabber Client. Have fun!

No comments:
Post a Comment